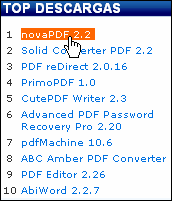
Dreamweaver Part Of Image Button Screenshots


Video Tutorial


The Vista Buttons Menu Extension for Dreamweaver allows you to create powerful dropdown menus, directly in Dreamweaver 3.0, Dreamweaver UltraDev 1.0, Dreamweaver 4, Dreamweaver UltraDev 4.0, Dreamweaver MX, Dreamweaver MX 2004, Dreamweaver 8, Dreamweaver CS3 or CS4. Create, insert, modify a css menu without leaving your favorite web design framework! Fully customizable appearance! Use one of the 500+ web buttons, 100 submenu designs, 6600+ icons, 50 ready-made samples, or create your own using the theme editor. With support for custom images, icons, colors, font styles, the possibilities are limitless. You'll create really nice looking web menus and web buttons with little or no design skills at all!


Menu, Button, and Icon Collection

Dreamweaver Menu Extension provides huge collection of 1400 web buttons, 6600 icons, 300 ready-made samples, so you'll create really nice looking menus and buttons with little or nodesign skills at all! Web 2.0, Mac, iPhone, Aqua buttons, Vista, XP, transparent, round, glossy, metallic, 3d, tab menus, drop down menus will be a breeze!

Button and Icon Samples

Features

Widest cross-browser compatibility
The html menus generated by Dreamweaver Menu Extension run perfectly on all old and new browsers, including IE5,6,7,8, Firefox, Opera, Safari and Chrome on PC, Mac, and Linux. Dreamweaver Menu Extension menus have a structure based on HTML list of links (LI and UL tags), readable by any search-engine robots and text browsers.

Dreamweaver How To Write Css Script Size
You can set the size of the menu in pixels.

Html Cool Buttons Fully Customizable
Every button or menu parameter can be easily customized in Dreamweaver Menu Extension to fit your web site design and your needs. Create your very own html menus, as simple or as complex as you want!

Extension Menu Para Dreamweaver 8 Dreamweaver Part Of Image Button Multilanguage User Interface (MUI)
Since the version 2.79 Dreamweaver Menu Extension supports the multilanguage user interface. Dreamweaver Menu Extension is translated into the numerous of languages such as: German, Dutch, French, Italian, Spanish, Portugues, Arabic, Polisch, Romanian, Hungarian, Bahasa Malaysia.

Create your own button themes
Theme editor helps you create your own themes or modify existing ones.

Cost Effective
Stop paying month-to-month subscription to web image and icon collections! Don't waste your money on licenses for every new domain where you want to place the menu! Pay once, use for life, anywhere!


2.0 Buttons by Web-Buttons.com v3.0.0

How to use Dreamweaver Menu extension

    To install the menu into your html page you should do the following things:

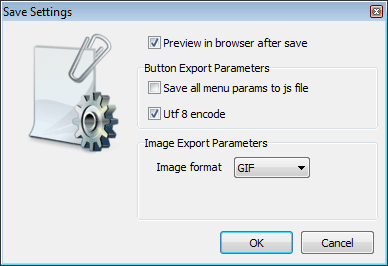
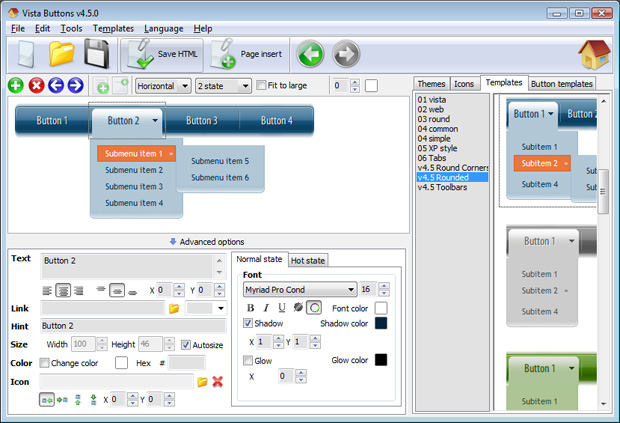
    Create and save your buttons in any temp folder using Vista Buttons application. It will be better to export all menu code to external .js file. Go to "Tools/Export options...". Check "Save all menu params to js file" option.

    Export options

    You can use "Save as HTML" function.

    Save Dreamweaver navigation

    You can enter any name you like, for example enter "menu":

    Save Dreamweaver menu name

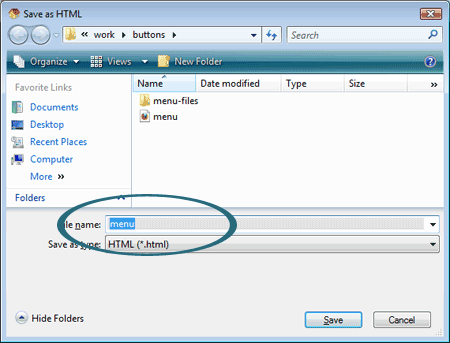
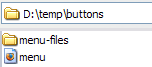
    So you'll have menu.html file and "menu-files" folder with all menu files.

    Generated files

    Insert a dreamweaver navigation to many pages using library

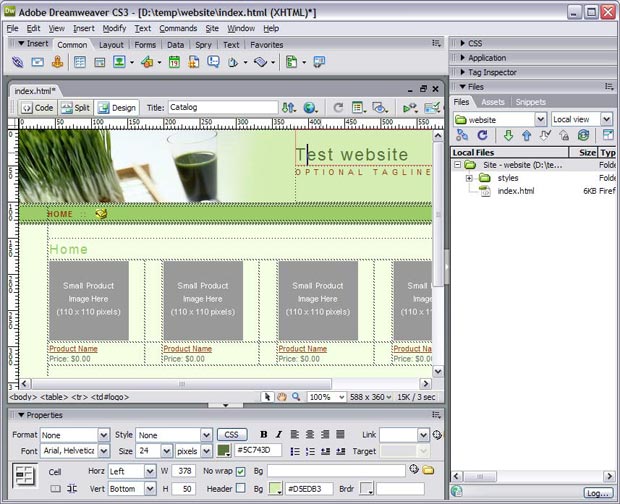
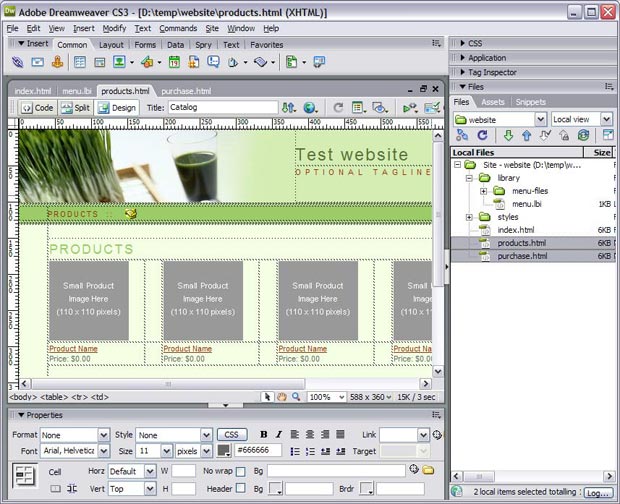
    - Start Dreamweaver and open your website. When the website opens, it should look like this:

    Open website in Dreamweaver

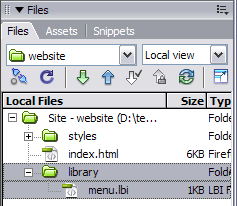
    - To create the library item you should do the following things:
    Create a new folder in the root of your website, for example "library". In this folder create a "New File" and name it menu.lbi.

    Create Library in Dreamweaver

    - Now you can add a javascript menu in your library. Open menu.lbi page (double-click menu.lbi in Files list window) and switch to the HTML View. Delete all code from this page. Open the generated in Vista Buttons menu.htmlpage in any text editor. Copy all code within the following tags:
          <!-- Begin Vista-Buttons.com -->
            ...
          <!-- End Vista-Buttons.com -->

    - Go back to Dreamweaver. Go to the "Edit Menu" with Dreamweaver and select the "Paste" option to paste the menu code that we copied to the clipboard earlier. To display images correctly you should change vbImgPath parameter. Find the following code
    var vbImgPath="menu-files/"
    and change it to
    var vbImgPath="library/menu-files/"

    Add menu code to a library in Dreamweaver

    - Save you menu.lbi file.

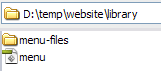
    - Now you should copy the "menu-files" folder into the same folder with your menu.lbi library file ("library" folder).

    Copy menu files in Dreamweaver

    - Create two pages and insert the library item to the pages.

    Add pages to your website in Dreamweaver

    - Open "Assets" tab in the Files list window. Select "Library" tab in the left side of this window. Drag the library item into your pages respectively. So, all your pages will have the same navigation. Save your page now.

    Drag library to your pages in Dreamweaver

    - Repeat the previous step for all pages where you want to have the javascript menu.

    - Notice that in the Design mode your menu won't display. It is normal. You should view your page in browser.

    Design mode in Dreamweaver

    - That's all. You've added all necessary code to your page, so let's test it. Select "File/Preview in browser/IExplore" to display the page live (in Internet Explorer).

    Result

    - If everything goes well, save and publish your website. If something seems wrong, double-check that you followed all the steps correctly.

    - If you still run into trouble, we'd be happy to assist you further. You can post your problem to us at , and meanwhile describe your files in details.


Support

Please contact Customer Support at (please include template name in the message title)


FAQ


See also

Inserting Flash Files into a Web Page with Adobe Dreamweaver CS5 The process is similar to inserting an image file, but Dreamweaver has you don't have permission to change that part of Click on the Play button in the Property inspector

Creative DW Image Effects - The Creative DW Image Effects is a And the great part is that you can always go Shareware Connection - The Creative DW Image Effects is a Dreamweaver It also supports button actions and the effects

Dreamweaver-Templates.org Catalog - Index 2) Right click on the image itself and choose Buttons Characters Parts Rules Tiles Dreamweaver Web Site Templates | Dreamweaver

Dreamweaver-Templates.org Catalog - Index 2) Right click on the image itself and choose Buttons Characters Parts Rules Tiles Dreamweaver Web Site Templates | Dreamweaver

Peachpit: Using the Image Viewer in Dreamweaver MX 2004 > Using Using the Image Viewer in Dreamweaver MX 2004. By Click the Play button on the Property inspector to see the Image Viewer again Steve Krug - Part 1, Rocket

Master Templates in Dreamweaver: Part 1 | CreativePro.com This three-part series will tell you with a blue tab (circled in red in this image Click the Update button. After a moment, Dreamweaver will display the Update

dreamweaver rollover Image Rollover in Dreamweaver- Javascript Development. with Photoshop and Dreamweaver Part 5 Creating and Using Fireworks and Dreamweaver to Create Buttons

Dreamweaver: image swapping, target frame, image swap target frame, image swap, click of a button: You can make the image Internet/Online > Personal Web Pages > Dreamweaver > image Make that part of your site with frames

Cropping and Resizing Images in Dreamweaver NOTE: When you crop an image using Dreamweaver Click the image to select it on you page. Click the Crop button in the Property Cropping changes what part of the image is

Paypal button link over image map : Adobe Dreamweaver Paypal button link over image map - Adobe Dreamweaver is arguably the state of the art in WYSIWYG web Note: The following are HTML characters and may cause parts of

Adobe Dreamweaver CS4 * Use the Insert panel Or, Dreamweaver may insert code into the to insert a placeholder for an image without specifying an image file, Control-click or Option-click the Image button.

Dreamweaver Tutorials - Image Maps Creating Image Maps in Dreamweaver CS3. Image maps are just another on the image that we wish to use as part of our image to an area you would use the center button on

Cropping and Resizing Images in Dreamweaver NOTE: When you crop an image using Dreamweaver Click the image to select it on you page. Click the Crop button in the Property Cropping changes what part of the image is

Boonage � Blog Archive � Orb Button Effect - Dreamweaver Orb Button Effect - Dreamweaver Part: which will show on how to make a simple an example done by doing small changes on the image in Orb Button Effect - Photoshop Part

Creating Solid Rollover Buttons in Dreamweaver Using CSS, Page 2 Part 2 of 2 Thanks to CSS you can now make rollover buttons in dreamweaver instead of inserting them one Now press F12 to preview your button in a browser. (See Image 8

Creating JavaScript Rollover Buttons integrated into Frontpage, Dreamweaver and You can then slice the image to get the final individual buttons. Now we need to make the buttons roll! >> Part II